0%

搭建博客系列:基础建站篇

本文主要是介绍 hexo 的一些建站、next 主题美化以及在这过程中遇到的问题等,如有不足之处,请留言

修改浏览器右侧滚动条样式

在目录theme/next/source/css/main.styl添加以下代码

1
2
3
4
5
6
7
8
9
10
11
12
13
14
15
16
17
18
19
20
21
22
23
// 修改侧边栏滚动条
::-webkit-scrollbar-thumb {
background-color: #ff2a68;
background-image: -webkit-linear-gradient(
45deg,
rgba(255, 255, 255, 0.4) 25%,
transparent 25%,
transparent 50%,
rgba(255, 255, 255, 0.4) 50%,
rgba(255, 255, 255, 0.4) 75%,
transparent 75%,
transparent
);
border-radius: 3em;
}
::-webkit-scrollbar-track {
background-color: #ffcacaff;
border-radius: 3em;
}
::-webkit-scrollbar {
width: 8px;
height: 15px;
}

修改行内代码颜色样式

在根目录source\_data\styles.styl目录下添加以下代码:

1
2
3
4
5
6
7
8
9
// 针对Code代码标签的美化
code {
padding: 2px 4px;
word-wrap: break-word;
color: #c7254e;
background: #f9f2f4;
border-radius: 3px;
font-size: 18px;
}

主页文章添加阴影效果


在根目录source\_data\styles.styl目录下添加以下代码:

1
2
3
4
5
6
7
.post {
margin-top: 60px;
margin-bottom: 60px;
padding: 25px;
-webkit-box-shadow: 0 0 5px rgba(202, 203, 203, .5);
-moz-box-shadow: 0 0 5px rgba(202, 203, 204, .5);
}

为什么侧边目录栏格式会出错?

样式错误如下图:

原因:Markdown 语法的标题等级需要依次排列,比如一级标题后面只能是二级标题,不能跨级

1
2
3
4
5
6
7
8
正确:
# 一级标题
## 二级标题

错误:
# 一级标题
### 三级标题


修改代码块的背景颜色

themes\next\config.yml目录下的highlight_theme设置为normal

1
2
3
4
5
6
7
8
9
10
11
12
codeblock:
# Code Highlight theme
# Available values: normal | night | night eighties | night blue | night bright | solarized | solarized dark | galactic
# See: https://github.com/chriskempson/tomorrow-theme
highlight_theme: normal
# Add copy button on codeblock
copy_button: #复制按钮
enable: true
# Show text copy result.
show_result: true
# Available values: default | flat | mac
style: default

添加图片灯箱

添加灯箱功能,实现点击图片后放大聚焦图片,并支持幻灯片播放、全屏播放、缩略图、快速分享到社交媒体等,该功能由 fancyBox 提供,效果如下:
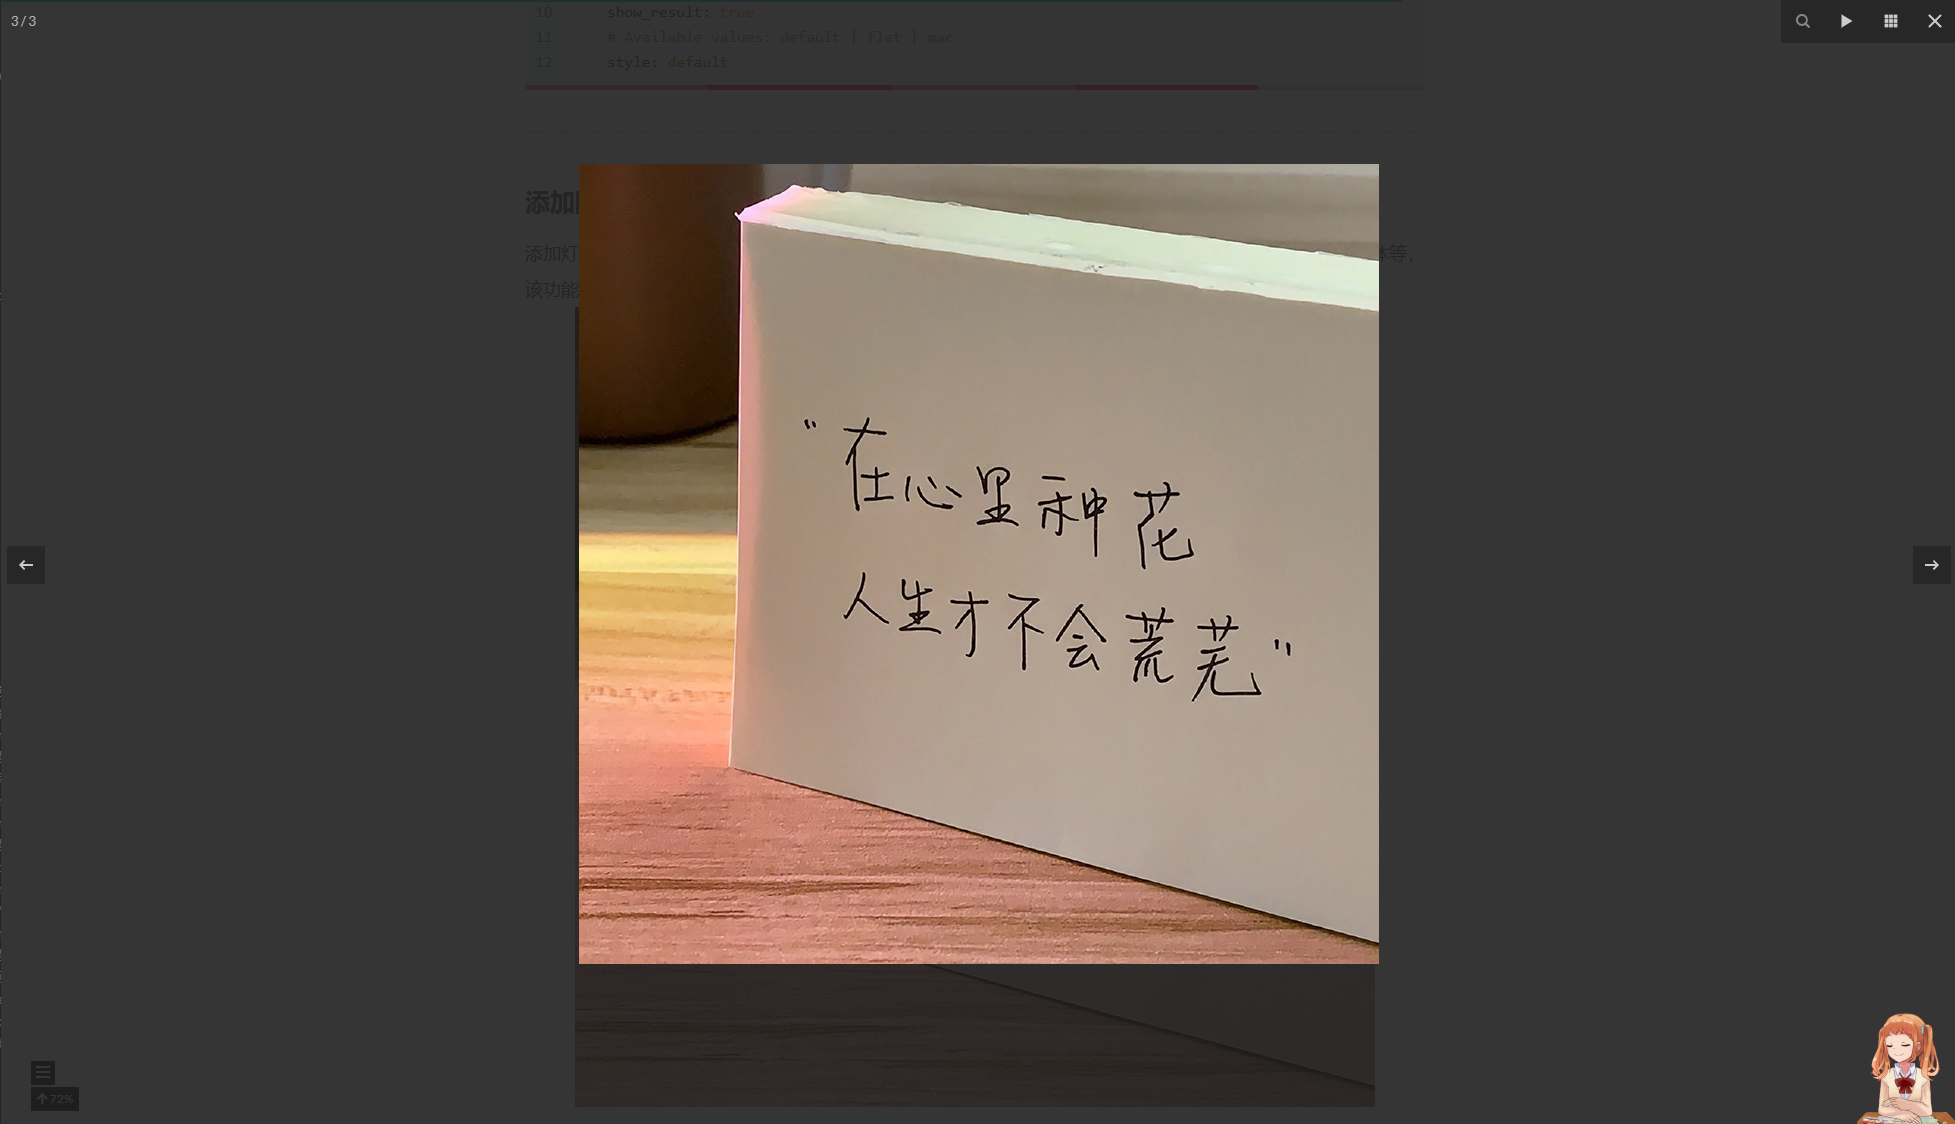
在根目录下执行以下命令安装相关依赖:

1
$ git clone https://github.com/theme-next/theme-next-fancybox3 themes/next/source/lib/fancybox

在主题配置文件中设置 fancybox: true,然后刷新浏览器即可生效。

1
fancybox: true

在 hexo 博客中添加豆瓣个人主页

  1. 安装
1
npm install hexo-douban --save-dev
  1. 在博客站点的配置文件 _config.yml 中添加以下内容(注意:不是主题的配置文件)
1
2
3
4
5
6
7
8
9
10
11
12
13
14
# hexo-douban
douban:
user: xxxx # 你的豆瓣ID
builtin: true
book:
title: "那些年,我翻阅过的书"
quote: "思想和身体,总有一个在路上"
movie:
title: "那些年,我追过的电影"
quote: "过去、现在、和未来"
game:
title: "那些年,我玩过的游戏"
quote: "还记得你曾经的游戏角色吗"
timeout: 10000
  • user: 你的豆瓣 ID.打开豆瓣,登入账户,然后在右上角点击 “个人主页” ,这时候地址栏的 URL 大概是这样:”https://www.douban.com/people/xxxxxx/“ ,其中的”xxxxxx”就是你的个人 ID 了。
  • builtin: 是否将生成页面的功能嵌入 hexo s 和 hexo g 中,默认是 false,另一可选项为 true(1.x.x 版本新增配置项)。
    如果配置了 builtin 参数为 true,那么除了可以使用 hexo douban 命令之外,hexo g 或 hexo s 也内嵌了生成页面的功能。
  • title: 该页面的标题.
  • quote: 写在页面开头的一段话,支持 html 语法.
  • timeout: 爬取数据的超时时间,默认是 10000ms ,如果在使用时发现报了超时的错(ETIMEOUT)可以把这个数据设置的大一点。
    注意:如果只想显示某一个页面(比如 movie),那就把其他的配置项注释掉即可。

博客文章添加问文章置顶

  1. 安装插件hexo-generator-index-pin-top
1
npm install hexo-generator-index-pin-top --save
  1. 在需要置顶的文章的 Front-matter 中加上 top: true ,比如:
1
2
3
4
5
6
7
---md
title: LIFE
date: 2022-01-08 11:35:47
tags:
- 格言
top: 10
---
  1. 重启
1
2
hexo g
hexo s

隐藏文章

在文章头部增加hidden: true即可隐藏文章,但是通过地址栏还是可以访问隐藏的文章

1
2
3
4
5
6
7
---
title: Hexo主题美化
date: 2025-02-21 16:14:28
tags:
- hexo
hidden: true
---

修改 note 标签的样式

themes\next\config.yml目录下,找到以下代码,修改style: modern,如下所示:
配置参数有:simplemodernflatdisabled

1
2
3
4
5
6
7
8
9
10
11
12
# Note tag (bs-callout)
note:
# Note tag style values:
# - simple bs-callout old alert style. Default.
# - modern bs-callout new (v2-v3) alert style.
# - flat flat callout style with background, like on Mozilla or StackOverflow.
# - disabled disable all CSS styles import of note tag.
style: modern
icons: true
# Offset lighter of background in % for modern and flat styles (modern: -12 | 12; flat: -18 | 6).
# Offset also applied to label tag variables. This option can work with disabled note tag.
light_bg_offset: 0


添加网易云外链


themes\next\layout\_macro\sidebar.swig目录下,添加以下代码,如下所示:

1
2
3
4
5
6
7
8
<aside class="sidebar">
<div class="sidebar-inner">
<!-- 网易云音乐外链 -->
<iframe frameborder="no" border="0" marginwidth="0" marginheight="0" width=330 height=86 src="//music.163.com/outchain/player?type=2&id=434902428&auto=0&height=66"></iframe>
<!-- 网易云音乐外链end -->
</div>
</aside>
<div id="sidebar-dimmer"></div>

隐藏网页底部 powered By Hexo / 强力驱动

打开themes/next/layout/_partials/footer.swig,注释代码即可,或者直接删除。位置如图:


底部添加网站运行时间


打开themes/next/layout/_partials/footer.swig,添加以下代码:

1
2
3
4
5
6
7
8
9
10
11
12
13
14
15
16
17
18
19
20
21
22
23
24
25
26
27
28
29
30
31
32
33
34
35
36
<span id="sitetime"></span>
<script language=javascript>
function siteTime(){
window.setTimeout("siteTime()", 1000);
var seconds = 1000;
var minutes = seconds * 60;
var hours = minutes * 60;
var days = hours * 24;
var years = days * 365;
var today = new Date();
var todayYear = today.getFullYear();
var todayMonth = today.getMonth()+1;
var todayDate = today.getDate();
var todayHour = today.getHours();
var todayMinute = today.getMinutes();
var todaySecond = today.getSeconds();
/* Date.UTC() -- 返回date对象距世界标准时间(UTC)1970年1月1日午夜之间的毫秒数(时间戳)
year - 作为date对象的年份,为4位年份值
month - 0-11之间的整数,做为date对象的月份
day - 1-31之间的整数,做为date对象的天数
hours - 0(午夜24点)-23之间的整数,做为date对象的小时数
minutes - 0-59之间的整数,做为date对象的分钟数
seconds - 0-59之间的整数,做为date对象的秒数
microseconds - 0-999之间的整数,做为date对象的毫秒数 */
var t1 = Date.UTC(2021,09,18,15,00,00); //北京时间2018-2-13 00:00:00
var t2 = Date.UTC(todayYear,todayMonth,todayDate,todayHour,todayMinute,todaySecond);
var diff = t2-t1;
var diffYears = Math.floor(diff/years);
var diffDays = Math.floor((diff/days)-diffYears*365);
var diffHours = Math.floor((diff-(diffYears*365+diffDays)*days)/hours);
var diffMinutes = Math.floor((diff-(diffYears*365+diffDays)*days-diffHours*hours)/minutes);
var diffSeconds = Math.floor((diff-(diffYears*365+diffDays)*days-diffHours*hours-diffMinutes*minutes)/seconds);
document.getElementById("sitetime").innerHTML=" 本站已运行"+/*diffYears+" 年 "+*/diffDays+" 天 "+diffHours+" 小时 "+diffMinutes+" 分钟 "+diffSeconds+" 秒";
}/*因为建站时间还没有一年,就将之注释掉了。需要的可以取消*/
siteTime();
</script>

添加搜索功能

在根目录下执行以下命令安装相关依赖:

1
$ npm install hexo-generator-searchdb --save

在主题配置文件themes\next_config.yml中修改相关字段:

1
2
3
4
5
local_search:
enable: true
trigger: auto # 每次输入改变都执行搜索
top_n_per_article: 3 # 每篇文章显示的搜索结果数量
unescape: false

在站点配置文件_config.yml中添加以下字段:

1
2
3
4
5
search:
path: search.xml
field: post # 指定搜索范围,可选 post | page | all
format: html # 指定页面内容形式,可选 html | raw (Markdown) | excerpt | more
limit: 10000

注意:使用搜索功能时,很有可能在本地运行功能和样式都是 ok 的,但是一旦部署到服务器之后,就会出现功能和样式都不可用。
所以需要在_config.yml文件中修改public_dir文件路径,如下:

1
2
3
4
5
6
7
8
9
# Directory
source_dir: source
public_dir: ../public
tag_dir: tags
archive_dir: archives
category_dir: categories
code_dir: downloads/code
i18n_dir: :lang
skip_render:

修改全局样式

全局样式文件source/_data/styles.styl,在此文件中可以统一修改样式


设置导航栏边缘摆动效果

  1. 下载wobblewindow.js文件,将下载的文件放在themes/next/source/js
  2. 找到themes/next/layout/_layout.swig样式文件,需要给标签设置id名,如下代码:
    1
    2
    3
    4
    5
    6
    7
    8
    9
    10
    11
    12
    13
    14
    15
    16
    17
    18
    19
    20
    21
    22
    23
    24
    25
    26
    27
    28
    29
    30
    31
    32
    33
    34
    35
    36
    37
    38
    39
    40
    41
    42
    43
    44
    45
    46
    47
    48
    49
    50
    51
    52
    53
    54
    55
    56

    <header id="header" class="header" itemscope itemtype="http://schema.org/WPHeader">
    <div class="header-inner">{% include '_partials/header/index.swig' %}</div>
    </header>

    <footer id="footer" class="footer">
    <div class="footer-inner">
    {% include '_partials/languages.swig' %}
    {{ partial('_partials/footer.swig', {}, {cache: theme.cache.enable}) }}
    {{ partial('_third-party/statistics/index.swig', {}, {cache: theme.cache.enable}) }}
    </div>
    </footer>

    {# wobble窗口摆动特效 #}
    {% if theme.wobble.enable %}
    <script src="/js/wobblewindow.js"></script>
    <script>
    //只在桌面版网页启用特效
    if( window.innerWidth > 768 ){
    $(document).ready(function () {
    {% if theme.wobble.header %}
    $('#header').wobbleWindow({
    radius: {{ theme.wobble.radius }},
    movementTop: false,
    movementLeft: false,
    movementRight: false,
    debug: false,
    });
    {% endif %}

    {% if theme.wobble.sidebar %}
    $('#sidebar').wobbleWindow({
    radius: {{ theme.wobble.radius }},
    movementLeft: false,
    movementTop: false,
    movementBottom: false,
    position: 'fixed',
    debug: false,
    });
    {% endif %}

    {% if theme.wobble.footer %}
    $('#footer').wobbleWindow({
    radius: {{ theme.wobble.radius }},
    movementBottom: false,
    movementLeft: false,
    movementRight: false,
    offsetX: {{ theme.wobble.offset }},
    // position: 'absolute',
    debug: false,
    });
    {% endif %}
    });
    }
    </script>
    {% endif %}
  3. 找到themes/next/_config.yml配置文件,开启摆动效果
    1
    2
    3
    4
    5
    6
    7
    8
    # window woblle
    wobble:
    enable: true # 是否开启边缘波动效果
    radius: 50 # 波动半径
    sidebar: false # 开启侧边栏边缘摆动
    header: true # 开启头部边缘摆动
    footer: true # 开启脚部边缘摆动
    offset: 10

参考链接:

赏包辣条吃吧